Total Pageviews

Showing posts with label Carol Brooke. Show all posts

Wednesday, June 3, 2015

Mother Goose Time- Planting Seeds and Worm Painting

Planting Seeds

The girls loved learning about planting their own seeds and watching the seeds grow into plants.

This week we learned about soil, seed, sun, water, roots and worms.

Here are some highlights from our week and our favorite lesson plans you can feel free to use, too.
 
Although this lesson has been designed for preschool, this is also exactly what 2nd grade children learn for life cycles of plants! (I was a K-2nd grade teacher.) So, this worked out perfect to use with both of my daughters (ages 3 and 8).
 
Mother Goose Time included the following to help us get started with planting:
  • soil
  • seeds
  • Growing a Garden Observation Record (pictured above)
You will also need:
  • Spray bottle filled with water for daily watering
 We put their little pots right on the breakfast nook table, and every morning the girls loved to water their plants. The grass grew very quickly.
 
We ended up adding the soil and grass seeds to the Experience God (supplemental add-on) pots the girls made that their little beans were growing in.
 
These pots are prettier and the girls had decorated them. So, they have two types of seeds growing in the pot, a bean and grass seed.
 
The sunny garden journals were beautiful! The girls loved sitting in front of their potted plants and writing in their journals.
 
I noticed that our 3-year-old daughter drew a picture that turned out great! For some reason, she was not happy with it, so she scribbled all over it. It seems like that is pretty typical for that age. I've worked with a lot of preschool through kindergarten-age children, and it seems to get better towards the end of Kindergarten.
 
It must be very challenging to develop strong fine motor skills while coloring, and it can be frustrating for young children who are trying to express themselves and get their little hands to create what their minds are thinking.
 
I typically like to hurry and pick up the work my preschooler has completed before she stares at it and decides she doesn't like it, and then proceeds to scribble over the top of it. Her older sister used to rip it up, not just scribble over the top of it. :) Fortunately, it seems that this acting out of frustration ends at just about when they develop stronger fine motor skills.

Worm Painting

 
I was so disgusted when I saw a teacher using real worms for the children to paint! I can't remember if this was for Kindergarten or First Grade. This was years ago. I do know that the teacher had the children gently wash the worms and put them back into the school garden when they were done.  I was surprised to see plastic, very realistic looking worms inside our Mother Goose Time daily lesson plan kit. I was thankful that these were just plastic, and not real. :) Thank you, Mother Goose Time.
 
Here are our worm paintings. The girls dipped the plastic worms into the paint and rolled them onto the paper. The process created interesting patterns. They enjoyed the process of creating their own designs.


After the girls were done with their worm paintings, they decided to wash the plastic, pretend worms and put them into their pots with their growing seeds. They liked to pretend that the worms were making their home inside the pots, next to their growing plants.
 
I'll share more free lesson plans with you soon. Next time, we will learn about watching gardens grow: sprout and stem, leaves, flowers, produce and weeds.
 
I'll also share a fun Mother Goose Time Experience God lesson plan, which is an add-on. This lesson is about the farmer who planted seeds, and how those seeds are like the word of God in our lives... I'll give you the posters and script to read, along with a fun planting activity to illustrate how seeds grow when they are taken care of properly. Where we decide to plant those seeds surely makes a difference in how the seeds grow.


Monday, May 25, 2015

Mother Goose Time - Ocean Exploration Preschool Lesson Plans

Here  are some free ocean exploration lesson plan ideas from Mother Goose Time.

This was our last week of four weeks. The girls absolutely loved learning about the ocean.


The Mother Goose Time activities for this month helped create fun memories for the girls, and I'm sure they will remember many of these activities for years to come.

It also made my life so much easier to have each days activities organized ahead of time in the daily bags, so we can simply open the bags and follow the instructions. It honestly took us longer than a month to complete everything, because there was so much to do!

I love the ocean, especially dolphins and whales.  I almost chose to study dolphins and their echolocation at U.C. Santa Cruz after finishing undergrad. Instead, I studied counseling and teaching. I felt like this month's Mother Goose Time ocean unit really helped me focus more on my love of dolphins and whales, while having fun teaching my daughters, too. I feel like I need to write a children's book about dolphins and whales. I will begin my research for my children's book on our Dolphin Safari fieldtrip, which I will tell you more about towards the end of this post. As you'll see, I planned an amazing adventure for the girls to end our ocean study unit!

This month the girls learned about the ocean, which included:

  • Ocean scape

  • Large sea creatures

  • Small sea creatures

  • Ways to explore the ocean


Our daily activities for the week of ocean exploration consisted of:
  • Diver
  • Shipwreck
  • Fishing Boat
  • Submarine
  • Aquarium

Today, I'll share our favorite three Mother Goose Time preschool ocean lesson plans from our last week with you.


The girls loved the diver, shipwreck and submarine lesson plans!


Diver Mask and Flippers Craft and Dramatic Play


First, the girls made diving masks and flippers. You can create flippers and masks on cardstock. To save money on supplies, you can recycle old file folders to create the flippers and mask, rather than using cardstock.

Mother Goose Time included all the needed supplies (except for tape, scissors and markers) in the activity bag for the day, so we did not need to create any templates for the mask or flippers.

You can see the shape and design of the mask and flippers in the photographs shown, and use this as a guide to create your own templates for the mask and flippers.

Then, trace the template you created onto cardstock or file folders. Because the kids will use the mask and flippers to act out being a diver, it is probably best to use cardstock or an old file folder to create the mask and flippers because construction paper rips too easily.

Supplies:
  • Mask made out of cardstock or an old file folder
  • Flippers made our of cardstock or an old file folder
  • Elastic or yarn
  • Scissors
  • Tape
  • Crayons or Markers
  • Cellophane (optional)
Directions:

Please note that Mother Goose Time created the templates for us. So you can re-create this at home, I am suggesting other options with supplies you probably already have handy. :)

Mask

1. Color the mask template.
2. Glue or tape the cellophane onto the mask (optional).
3. Punch holes on the side and tie on the elastic or yarn to fit around the child's head.

Flippers
1. Color the flippers.
2. Either cut a line across the top of the flipper to fit onto the child's feet, or just tie it on with some yarn.

After the girls created their masks and flippers they acted out being a diver. We discussed breathing under water with an air tank. We also talked about how the mask helps the diver see under water.

Mother Goose Time sent us a beautiful underwater poster and sea creatures. We cut out all the sea creatures and the girls put them onto the underwater scene.

Then, they put on their scuba gear and pretended to go inside the poster and into the underwater scene with all of the ocean animals.

The girls named all off the animals.

"Look mom, a sea turtle!"

"I see an octopus!"


Shipwreck Hideaway Game

Daddy, the girls and I played this game together on Saturday morning. It was so much fun!

This game includes both dramatic play and a board game simultaneously.

We asked the girls what they might find in a shipwreck. They built a shipwreck out of blankets and toys in the room.

We told them to pretend they are small fish and to hide in a shipwreck to avoid
danger, just as real fish do.

"Look! A shark! I am going to hide in the shipwreck!"

As the girls kept themselves busy, we got out the board game.

Mother Goose Time included the board (printed onto poster paper), game cards with fish in different colors and two game pieces (colorful fish that push into suction cups that pop up).

I love the little fish Mother Goose Time included as game pieces. The colorful fish push down onto the suction cups and will pop up. This is a great way to keep a preschool child occupied while they wait for their turn. :)

I like how Mother Goose Time suggests having children explore pretending to be a fish hiding in a shipwreck under blankets, blocks or other toys. That's also a great way to keep the children busy until they wait for their turn.

Instructions:
1. During their turn, each child turns over a card with a colorful fish (purple, green, orange or pink) on it.
2. The child moves their game piece fish onto the corresponding color circle (purple, green, orange or pink) on the game board.
3. The child who gets to the shipwreck first wins.

How to Create a Shipwreck Hideaway Game at Home


You probably already have most of these supplies on hand...

To create a similar board game at home or for your classroom children, you could draw a shipwreck onto posterboard or large white paper and have the children color it.

You can trace over each circle with a different color leading up to the shipwreck.

For the game pieces, you could use fish crackers.

For the cards, you can draw colorful fish onto small pieces of paper, or you could put pom poms into a bag with colors that correspond with the circles on the game board.

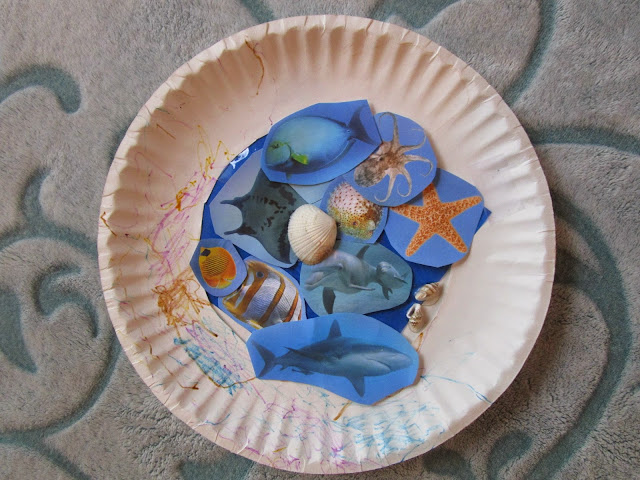
Submarine Window Collage Craft

We talked about what you might see from a submarine window. We looked at a picture of a submarine.

Submarine windows are usually round and are called a porthole.

Supplies:
  • Paper plates (two for each child)
  • Cellophane (optional)
  • Ocean photos (optional, the children can draw sea creatures, if needed.)
  • Markers, crayons or paint
  • Seashells (optional)
  • Glue
  • Scissors
  • Tape
Instructions:

1. Children decorate the plate to look like what they would see while looking out a porthole.
2. Help the child cut out the center of the second plate to frame the artwork, so it looks like a porthole.
3. Listen to what the child has to say about their porthole scene.

Our Ocean Exploration Real-Life Ocean Safari


http://www.dolphinsafari.com/
We are looking forward to our big field trip to end our studies about the ocean!

I found a Groupon deal for a dolphin safari and whale watching day trip with Captain Dave's Dolphin and Whale Watching Safari!

It was only $40 for our family of four, which would usually be close to $200!

You can enjoy learning more about the whales and dolphins on their website.

Here are some fun videos to watch with children that show dolphins and whales in the ocean (scroll down). They also have a children's book available.

You will love the drone video Captain Dave made on this website! He took the drone out and got amazing video of a mommy whale and her baby!

We'll post our ocean adventures from Captain Dave's Dolphin and Whale Watching Safari soon!


Our Next Mother Goose Time Adventure


Our adventure with Mother Goose Time this month is Growing Gardens!

We've got big plans! We'll be planting a garden, watching the garden grow, learning about vegetables and our garden visitors.

Our adventures will include getting real butterflies to raise and creating a greenhouse of our own!


Tuesday, April 21, 2015

Mother Goose Time, Oyster Pearls Craft and the Letter "O"

Oyster Pearls Craft and Lesson


Mother Goose Time shared a wonderful oyster pearls lesson plan with us this month, as part of the Ocean Commotion theme for April.

The girls loved making their own oyster shells with pearl bracelets inside!

Ages: Pre-K and up

Supplies:
  • Beads (real pearls can be white, pink, yellow, green, blue, brown or black)
  • Paper plate
  • Pipe cleaner
  • Paint

Holding up the paper plate, we discussed how the paper plate is shaped like an "o", as in oyster.

We looked at pictures of oysters and oyster pearls. I showed them a real pearl necklace, too.

I decided to show my daughters a video on youtube explaining why oysters have pearls. It's pretty
gross, but it's nice that something pretty can be made out of something so gross. The video explains that either a parasite or a grain of sand gets stuck inside the oyster. The oyster protects itself from the foreign matter by covering the grain of sand or parasite with lacquer, which is hexagonal aragonite crystals of calcium carbonate. (Of course, they don't know exactly what those words mean, but they get the general idea when they see the video show the process.)
https://m.youtube.com/watch?v=T18E58vOTus

Then, the girls got to paint their oyster shells. First, they painted the inside. They decided on yellow, even though it's usually pink. (Mother Goose Time included most of the needed supplies.)

As one side of the paper plate dried, they worked on their bracelets.

They strung several white beads onto the pipe cleaners.


"Look, a pearl bracelet!"

After they finished making their bracelets, they painted the outside shell (other side of the paper plate).

We folded the wet, painted plates and let it dry that way, so they would look like a oyster shells.


Field Trip to See Real Oysters and Pearls


One thing we love to do is go on field trips to see exactly what we are learning about in the real world. So, we went to Downtown Disney and visited one of the oyster shell
jewelers.

We were tempted to buy a pearl, but we just looked at them. :) The jewelers have the oysters in the shell, and if you decide to buy one, they will open the shell for you and you can pick out jewelry to have the jewelers set the pearl in.


You can see the oysters with pearls inside here.


After you choose and oyster and take out the pearl, you can get jewelry for your pearl.


It was fun for the girls to see a real oyster shell, create their own oyster shells and pearl bracelets, while really having an understanding of where real pearls come from... The ocean, not a bucket.


www.MotherGooseTime.com


Friday, April 10, 2015

Mother Goose Time, Discovering the Ocean Floor


Exploring the Ocean Floor Fun


Mother Goose Time included this "Ocean Commotion" preschool curriculum web in the April box!

It's great to hang this up for the kids to see. Each day, they explore the next activity on the web.

I enjoy using this web to explain writing to my 2nd grader, too. You can use the same type of web for any type of writing (story, report, biography, etc...)

Seashell Discovery, Music, Counting, Dancing and Acting


When my 3-year-old daughter discovered the seashells inside her Mother Goose Time preschool curriculum box, she was thrilled!

The seashells are beautiful. Wow!


She used the seashells to make music.

"Look Mom, the seashells are instruments!"

"Wow, it looks like animals live inside. Do animals live inside, Mom?"

We talked about the types of animals that live inside seashells. Which she found fascinating.

She even noticed that they were supposed to fit together on her own, and she opened and closed the shells.

She counted the seashells.
"1-2-3..." (up to twenty)

She counted in Spanish, too!

She sorted the seashells, and then counting the types of shells.


My daughters danced around the seashells on a blue ocean blanket, while we listened to the Mother Goose Time Ocean Commotion CD.

"I'm a fish!"
"I'm a dolphin!"
"I'm a sea turtle!"

They also loved exploring the ocean floor using their play magnifying glasses on this colorful poster.
They found a green plant, seashell, and octopus...

"Look Mom, this green plant looks different than the other one."


They turned the play magnifying glasses over and did more exploring, acting out discovery.


Then, over the weekend, we took a trip to downtown Disney to see the beautiful aquarium at the Rainforest Café.


We even made our own aquarium. We talked about the habitat, temperature of the water, and how we have a fresh water tank, rather than salt water (like the salt water tank at Rainforest Café).


The girls love to relax and watch the neon tetras swim in their new fish tank.

They can't wait to learn about large sea creatures next, such as the whale, octopus, dolphin, shark and sea turtle.

We'd love to share our adventures with you as we have fun learning. You can subscribe above, and you'll get an email next time we post our adventures.

What's your favorite ocean lesson? I'd love to hear your ideas in the comments below.

Thursday, March 26, 2015

Ocean Water Science Experiment with Mother Goose Time


I love how Mother Goose Time lesson plans can easily be differentiated, depending upon the ages and abilities of your children. This science experiment is a great example.

My daughters are three-years-old and seven-years-old, so their abilities are different from one another. My older daughter studies challenging curriculum appropriate for a 2nd grader. Mother Goose Time offers my older child a little break from academics, while still giving her the opportunity to learn and create, along with her little sister.

My three-year-old daughter loves sharing Mother Goose Time with her older sister, and each day is a fun and new adventure. It's so nice that each day's activities are separated in a separate bag with activities for both children, which is inside the themed, monthly school bus box. I love the daily curriculum guide that suggests songs, assessments and reflections.


Here is a fun ocean water experiment we enjoyed this week!


Ages: Preschool through Elementary Age

Mother Goose Time provided the above, pictured instructions sheet for the experiment.

Instead of bowls, we used a plate for the sugar and salt. I wrote "salt" and "sugar" below each one with a dry erase marker. I also wrote on the cups, being sure to keep the writing far below where they will drink.

The girls made their predictions...

How do you think ocean water tastes?


They prepared their supplies, and completed the experiment while using their senses of sight, smell and taste.

The girls smiled, laughed and discussed their observations.


Best of all, they had fun, sister bonding and as they learned that ocean water is salty and tastes about the same as a cup of water with one teaspoon of salt in it.

Saturday, March 26, 2011

Bumble Bear, A Personalized Book for Your Child

Have you ever read your child a book about a character who shares his name? It's so fun to see a child's eyes light up as he listens to a story in an attempt to learn more about the character. Children love to see their own names in books.


Description of How Your Child's Name Will Look in the Book:


"Grrrbuzz!" Can you imagine a bear shrinking to the size of a bumblebee? Stealing honey was Daniel* Bear's favorite pastime until his naughty nose gets a magical sting! Daniel* Bear's heart changes, after he transforms into a bumble bear with busy wings and a striped, "grrrbuzzing" tummy. All the forest creatures soon see that becoming a bumble bear has a way of bringing the best out of a bear.


(*Your child's name will appear throughout the entire text of the book!)


Character Building Literature: Empathy, respect and good work ethic.


Ages 7 & up


Ideal for beginning chapter book readers.

Sunday, February 15, 2009

Toddler Fairy

This is a sketch of my daughter as a fairy. I've decided to start experimenting more with watercolor again. I've been using pen and colored pencil lately, and I want to start working with watercolor more. When I finish her, I'll post again.

Friday, February 6, 2009

My Light Magazine - February Cover

Check out
My Light Magazine!

I just love the poem by Don Ford, Another Heavenly Flower Blooms, and the story, My Valentine's Day Card, by Jaclyn Morales that I got to illustrate. I also made the cover of Saint Valentine.

There's a Valentine's Day card from God the kids can make, too. Click here to see it!

Thursday, January 8, 2009

Interview with Jennifer Gladen at MyLightMagazine.com


Check out this interview at www.MyLightMagazine.com

(We are now into February, so the interview isn't online anymore. I'll see if I can scan it and post it online.)


I'm the new Illustrator Coordinator for the magazine.

For January, I did the illustration for the Grandad Prays poem.

Illustration copyright by Carol Brooke, 2009